Test Your Skills – Perfecting Your Technique (Part 3)
Moving back and forth between pentatonic boxes is not enough to create meaningful solos. In part 1 of this series, I mentioned that stretching is essential for being able to reach the wider frets at the top of the neck and to keep your fingers close to the fretboard so that you have less travel time going note to note. A couple other helpful pieces of advice are play against a metronome when practicing and get yourself a CAN DO Grip Master finger exerciser to build strength in all your fingers. In part 2, I showed you how to use different tricks to make pentatonic scales fit together. In this series, I teach you that the above advice is not the only way to perfect your skills, it also requires techniques like bending and arranging note formations that can be played in different places on the fretboard while still within the same key, but not an octave above.

In the image above, we start on the C note of the G string and, when we get on the E note of the B string, we bend it up half a step to the F note. If you’re not sure what that should exactly sound like first play the E on the B string, then play the F. Do that a few times to train your ear on what it should sound like when you actually bend it. Now, this time, bend the E up to the F. This should be easy enough to bend with your index finger to do the bend. You don’t want the full power of three fingers when you’re only bending the string up half a step (one fret). Play that part two times, then go to the second part. It’s the same finger patter, but starting on the G note of the G string. This time, we’re bending the B note up to the C note.
Another way of learning technique and the fretboard is to play patterns in different positions. Below are three blues patterns. The first two, you’ll notice, are all the same notes, just played in different positions. The third pattern is everything an octave up and along the edge of the neck of the guitar.

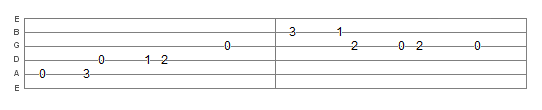

Use these techniques in your practice sessions to open your mind to new ways of learning the fretboard. You’ll soon be playing your pentatonic scales in ways you’ve never imagined. You’ll also open your mind to learning new songs that you’ve heard as you may be playing patterns that seem familiar.
Share this:

Learning the Fretboard – Part Six
Five months ago, I gave you a few tips from a few of the great teachers out on the internet that can greatly improve your playing. One question that I failed to answer is, “How do you learn how to play all over the fretboard without “climbing”, or going from one pentatonic box to the other?” The answer is simple, but the technique is one that comes with practice. This lesson will take the mystique out of how many of the great guitarists know EXACTLY where to go when playing.
Steve Stein teaches in Absolute Fretboard Mastery to learn the natural notes (meaning no sharps or flats) on each string relative to the fret number it falls on. For instance, on the low E (or 6th string), F is on the first fret, G is on the third, A is on the fifth, and so on. Each successive lesson takes a new string and finds all the natural notes on each string. If you commit these to memory, and REALLY commit them, you’ll have little to no trouble finding a note on the neck of the guitar. With this in mind, you should know that C falls on the 8th fret of the low E. As you continue on in lessons, you learn that C is also on the 3rd fret of the A, 10th fret of the D, and so on. You also learn where the A minor and A major pentatonic scales are. If we take the A minor pentatonic on the 5th fret of the low E, it will look like this:

If we add the blues note to this (which will be on the 6th fret of the A string and the 8th fret of the G), we can create a cool little riff like this:

Sounds kinda bluesy, but doesn’t challenge your learning curve very much, right? Exactly. You need something that sounds similar, but has a little more movement. Knowing that A on the 5th fret of the E is the same note as the open A string, and that we can play the same notes in a different pentatonic box in that area, we get this:


A little easier and more lively to play, but still located in one area of the fretboard. Knowing that the octave for A on the A string is on the 2nd fret of the G string, we can play something a little bit more challenging. Let’s take a look at the 4th and 1st pentatonic boxes in the key of C.
The 4th box comes between the two we previously reviewed (5th and 3rd pentatonic boxes, respectively). The 1st box comes after the 5th (A minor pentatonic) box, which is also known as the C major pentatonic. If we play the first half of the riff in the 4th box and the second half in the 1st box, we get a riff like this:

So, when it comes to learning a new riff, learn it in as many places as possible. You may find that the original riff, or one you created, sounds better played in a different spot on the fretboard…and you will learn more of the fretboard at the same time.
Share this:

How to Fix Silent Notes
Have you ever been practicing scales, playing a melody, or shredding a solo and noticed that the pick hit the string, but no sound came out? Chances are you have wore an edge into your pick that allows it to slide over the string instead of pluck it no matter how hard you try to get sound out of every note.
We’ve been told many times to keep your fretboard (and pickups, if you have an electric guitar) clean and change your strings often to preserve a quality sound, plus other tips for the rest of your gear, but no one has ever mentioned keeping your picks fresh. There’s a cool trick to eliminate the silent notes without paying nickels for a new pick.
With light pressure, I ran my pick across an emery board that I had placed on a flat surface. I made sure that I started midway on one side and rounded the bottom to the next. I then flipped the pick over and repeated the procedure. After doing this 3 or 4 times, I had a rounded tip with a flat edge. I then buffed the pick out with the same emery board to round out the edge like you’d find with a brand new pick. I played a few scales and a couple melodies to test it out and it worked! It was almost better than a new pick! Every note was crisp and clear.
While you can buy multiple picks for dirt cheap and toss the old one when it wears out, if you’re miserly like I am, you’ll find this trick impressive. Give it a try. If you don’t like how it sounds, buy a new pick and get back to practicing.
Share this:

Learning the Fretboard – Part Five
It’s been a while since I posted a lesson for this, but I feel this lesson will put Know Your Scales – Revisited in better perspective and pick up where Learning the Fretboard: Part Four left off.
First of all, for my next lesson to make sense, I need to highlight some things I’ve seen from famed instructor Steve Stein and Charlie from Guitar Mastery Method. When practicing your scales, ALWAYS use a metronome. I can’t express that enough. Not only will it help you keep a tempo, but it LITERALLY will help you with your speed. Both Steve and Charlie mention to “play them robotically”. Don’t try to get fancy right away, just GET THEM RIGHT! I was told once “you should only play something as fast as you can play it well.” If you are trying to keep up with Kirk Hammett from Metallica, you’re hindering your learning. Don’t feel bad if you have to set your metronome at 30 bpm. A helpful tip from Anders Mouridsen from Guitar Tricks in his lesson on Easy Open Chord Exercises is to start out slow, bump it up 2 (so if you start at 30 bpm, go up to 32), play, then take it down 1 (down to 31) and keep doing this as you get faster. If you’re patient enough to do this, you WILL see results.
This lesson works with the A minor pentatonic and the C major pentatonic. Both Steve and Charlie have slightly different ways of teaching how to put these two together, but I’ve found a different approach that, in a way, is the best of both of them. What you need to do is, not just learn your pentatonic boxes, but how to be able to put them together. Steve uses a method of practicing called “meandering”, where you take all your boxes and put them together, then, against a metronome, meander around in them without stopping. If you can’t think of where to go next, Steve suggests playing the same note until you think of something. A different way of meandering is taking two boxes at a time and playing both scales up and down while playing against a metronome. This way, you can get to know where each box matches up with the other before TRULY meandering between them.
Below is the A minor/C major pentatonics combined into one scale lesson. Practiced slowly against a metronome, you can start to get the feel of where your fingers should go when playing from one to the next. While this isn’t a set in stone way of how to navigate between boxes, it will help you develop confidence as to where to go next when you do truly meander.

Practice this for about 10 minutes each day using Anders method of increasing speed and you should see dramatic results in a week.
Share this:

Using Minor Pentatonic Over Non-relative Major Chord Progression
Recently, I was messing around with different riffs while playing against some new backing tracks I found. I was playing around in the key of A major and the F# minor pentatonic just wasn’t sounding right to me. It was missing something. Oddly, at the moment, I had a melody pop in my head that sounded good with the backing track. As I started hammering it out on the guitar, I realized I was playing the A minor pentatonic over the A major chord progression and it sounded perfect!
As I played on, I couldn’t believe what I was hearing. This totally blew all the rules of music theory out the window as I should have been playing F#m over A or Am over C. I dug into it a little further and found something very interesting. A major and C major have all the same notes except three in common; F#, C#, and G#. Because of the rest of the notes being common, my ear couldn’t tell the difference. The three that were not in common added just enough tension that my ear wanted to hear so it sounded better with that tension than without.
Below is the riff I came up with. It’s a six bar version of the 12 bar blues progression. I recorded several different strummings with the same chords and played the riff against them all. None of them sounded like they didn’t belong together.
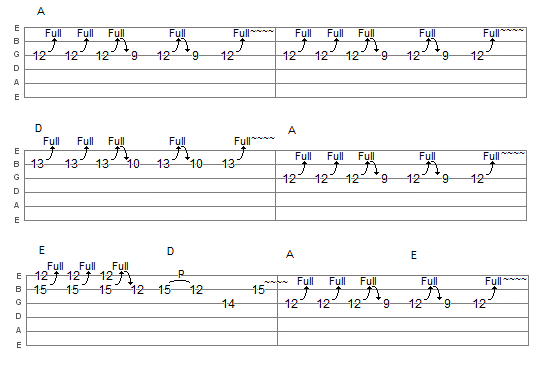
Give the riff a try. If you can, record the chord progression as I have labeled and play the riff against it. Or, try your own combinations. See if a C# minor pentatonic scale sounds good over a C# major chord progression. You may find, as I did, the possibilities are endless and it will give you a new sound.
Share this:

Generating Random Riffs
Recently, I was doing some guitar practice and I came up with a creative idea for coming up with new riffs that will take you out of your normal way of thinking and into a new way of broadening your talents. I found a random number generator at RANDOM.ORG, entered “4” for the number of random integers (numbers, for those who don’t know what integers are), set the range between 1 and 8 for the number of notes in a standard scale, and then ran the generator. The first set it came up with was 2-7-8-7. I took the C major scale and came up with this:
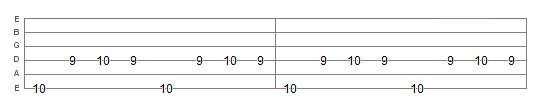
With the same settings, I came up with this in the key of A minor for 1-7-5-6:

Changing it up a little, I set the number of random integers to “6” and got this out of the key of G for 8-4-3-2-4-4:

Try this yourself. Change the number of integers to anywhere between 3 and 8 and see what new riffs you come up with. Try them in all major and minor scales. Try them in every location on the fretboard. Feeling ambitious? Try setting the number of integers higher than 8 to 12, or even 16 to create a mini solo like this one:

Remember, just because you practice the C major scale starting on the 3rd fret of the A string doesn’t mean that’s the only place to play the C major scale. It can be played starting on the 8th fret of the low E, the 15th fret of the A, the 10th fret of the D, and the 5th and 17th frets of the G. That’s 6 different places and 3 different sounds with a few different fingerings to challenge you even further…maybe you’ll like playing your new riff in a new location as well.
Share this:

Helping a friend…
A friend of mine asked me if there were any other tips to learning how to play melodies anywhere on the fretboard. I told him that there are many ways and no one way works for everyone. Then, I introduced him to the idea of Muzak. Everyone else knows it as “elevator music”. He asked me how that can help him better learn the guitar…then, I showed him.
Take your favorite song. It can be any song, but try to find one that has a simple melody rather than something complex. If you have a good ear, you should be able to pick up on some of the main chords used in the song. If you don’t, try using power chords, or any type of chord, to get a feel of which ones are being used. Once you know this, you can figure out the key the song is in. For example, if you hear the chords G, C, and D, the song is in the key of G major. If you haven’t figured out the rest of the chords, here is the progression you will be using to help you:
G – Am – Bm – C – D – Em – Fdim
Chances are you won’t be using all of them, especially the Fdim, but these are some of the chords that are guaranteed to be somewhere in the song. If you know that the sixth chord of a progression is the relative minor chord, then you can pretty much guess that the Em pentatonic scale will be used.

Now, if you know the tune well, you can hum along and plot the notes within the box patterns and find the fingering that best fits your hands and is easy to play. If you don’t know it that well, play the song a few notes at a time and figure out where you want to play the song. As a challenge, see how many places on the fretboard you can play the same melody. Better yet, see if you can add some slides, vibrato, hammer-ons and pull-offs, etc.
Share this:

Tuesday Night at the Improv
Recently, I was thinking of ways to teach my students better improvisation skills. Some were catching on to what I was teaching, but others seemed to not have a creative bone in their body. After a bit of brainstorming, I realized it was something they missed when I was teaching scales.
Take the C major scale below. You can play every note, you can play the pentatonic, or you can play random melodies. There is so much you can do, you just have to experiment. I told my students “Keep it simple. Most solos sound complex because the guitarist took something simple, built upon it, practiced it until they could build up the speed that it’s being played at, and what you hear sounds someone who is totally shredding the guitar when they are hardly putting in any effort into playing the solo.”
 My challenge was to come up with something “from string to string”, not “back and forth between the strings”. One student saw what I was looking for. He took the scale, then selected the notes shown in red below:
 Now that he had the notes he was going to use, how would he play these from string to string; meaning playing from A to D to G to B instead of going back and forth between the strings? Below is the lick he came up with:

For those of you Foreigner fans, this is similar to the solo for Cold As Ice:

Both solos, although similar, are also simple. There are no shifts back and forth from strings on the run up, there are no bends or unison bends, and there are no chord shapes. If my student would have kept the same pattern going, he could have created something that sounds very similar to Cold as Ice, but with a different spin. This is how solos are created. You take patterns, whether someone has already done it, or if you find it’s something new, and expand upon it. Eventually, you have something unique to you that you can play in any key.
Once my students realized that they were missing patterns within the scales they had been practicing, and that they can take those patterns, develop a lick, or a series of licks, they can then put them together to form a solo. This is truly what improvising is all about. When playing against backing tracks, these students became more confident in their solos.
Share this:

What is behind the 1-4-5 rule?
I’ve had several students ask me “What is behind the 1-4-5 rule?” For this, you have to understand how basic music theory works. “Ugh…what is with everyone trying to ram music theory down my throat? Just teach me how to play guitar!” Well, in this lesson, if you can’t listen to a song on the radio, pick up your guitar, and start playing along, maybe guitar isn’t for you.
Everyone thinks learning to play guitar means to learn how to play chords first. While that’s a good approach, how do you know where and when to use them? I teach scales first…especially the C scale seeing as it has no sharp or flats.

In the C scale, you have 7 notes: C, D, E, F, G, A, and B. If you consider these numbers from 1 – 7, C would be 1, D would be 2, and so on. Knowing the names of the notes in the scale, we can now develop chords by using the 1-3-5 method. To make a C major chord, you take C, E, and G (1-3-5 notes of the scale). If you take the 2-4-6 notes of the scale (D-F-A), you would get the D minor. Again, if you take the 3-5-7 notes (E-G-B), you would get the E minor chord. Continuing on, you would eventually end up with what is called the “C major chord progression”, as shown below.

How does this help with the 1-4-5 rule? Well, now that we have chords to play, we can actually play a song. How many songs do you know of that are purely solos or melodies? Not many, I’m sure. The 1-4-5 rule allows you to take the first, fourth, and fifth chord from a chord progression and make a song out of it. Don’t believe me? Play the C chord, followed by the F chord, then the G chord. Almost sounds like Twist and Shout, or Labamba. Or, try playing G-F-C-G.
While no songwriter really sits down and says “Okay…I need to use the 1-4-5 rule to write all my songs, and I’m in the key of C, so I need to use C, F, and G,” it does form the basic building blocks of many songs you hear.
What about minor progressions? It’s the same thing. If you know the relative minor of C is A minor, you can figure out almost any song in the key of A minor by looking at the following progression:

Now, your 1-4-5 would be A minor, D minor, and E minor. All the same chords as in the key of C. No, you do not need to stick with 1-4-5, but it will help you learn to play almost any song you can think of, or create your own.
I hope this helps. And remember: a little music theory goes a long way.
Share this:

It’s a Great Day from Paul Thorn
If any of you are a fan of The Bob and Tom Show, you’ll recognize this person. His name is Paul Thorn, and he sings the song “It’s a Great Day”. It’s one of my favorites and I’m about to pass the beginner version of the song off to you.
The song is fairly easy. It’s in the key of G, and consists of the G, C, and D chords. Although the real version is played with a capo, this version is just as good. For those who are familiar with chicken picking or classical music, this song shouldn’t be too hard to pick up. For others, this may be a bit of a challenge, so only play it as fast as you can play it well.
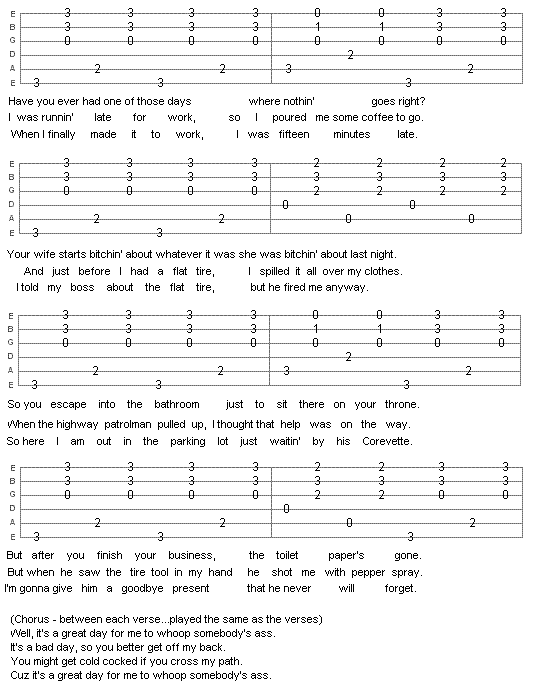
The bass notes on the E, A, and D are all played with the thumb. The rest are played with your middle, ring, and pinky fingers. It’s easiest to form the actual chords rather than to change fingerings for each piece. The chorus is played between each verse and follows the same musical pattern as the verses.
I hope you like this one. It’s fun, easy, and good humor. Play it for your friends and family. I’m sure they’ll get a good laugh as they too have experienced one, or all, of these instances.

