Blog Archives
Learning the Fretboard – Part Five
It’s been a while since I posted a lesson for this, but I feel this lesson will put Know Your Scales – Revisited in better perspective and pick up where Learning the Fretboard: Part Four left off.
First of all, for my next lesson to make sense, I need to highlight some things I’ve seen from famed instructor Steve Stein and Charlie from Guitar Mastery Method. When practicing your scales, ALWAYS use a metronome. I can’t express that enough. Not only will it help you keep a tempo, but it LITERALLY will help you with your speed. Both Steve and Charlie mention to “play them robotically”. Don’t try to get fancy right away, just GET THEM RIGHT! I was told once “you should only play something as fast as you can play it well.” If you are trying to keep up with Kirk Hammett from Metallica, you’re hindering your learning. Don’t feel bad if you have to set your metronome at 30 bpm. A helpful tip from Anders Mouridsen from Guitar Tricks in his lesson on Easy Open Chord Exercises is to start out slow, bump it up 2 (so if you start at 30 bpm, go up to 32), play, then take it down 1 (down to 31) and keep doing this as you get faster. If you’re patient enough to do this, you WILL see results.
This lesson works with the A minor pentatonic and the C major pentatonic. Both Steve and Charlie have slightly different ways of teaching how to put these two together, but I’ve found a different approach that, in a way, is the best of both of them. What you need to do is, not just learn your pentatonic boxes, but how to be able to put them together. Steve uses a method of practicing called “meandering”, where you take all your boxes and put them together, then, against a metronome, meander around in them without stopping. If you can’t think of where to go next, Steve suggests playing the same note until you think of something. A different way of meandering is taking two boxes at a time and playing both scales up and down while playing against a metronome. This way, you can get to know where each box matches up with the other before TRULY meandering between them.
Below is the A minor/C major pentatonics combined into one scale lesson. Practiced slowly against a metronome, you can start to get the feel of where your fingers should go when playing from one to the next. While this isn’t a set in stone way of how to navigate between boxes, it will help you develop confidence as to where to go next when you do truly meander.

Practice this for about 10 minutes each day using Anders method of increasing speed and you should see dramatic results in a week.
Share this:

Using Minor Pentatonic Over Non-relative Major Chord Progression
Recently, I was messing around with different riffs while playing against some new backing tracks I found. I was playing around in the key of A major and the F# minor pentatonic just wasn’t sounding right to me. It was missing something. Oddly, at the moment, I had a melody pop in my head that sounded good with the backing track. As I started hammering it out on the guitar, I realized I was playing the A minor pentatonic over the A major chord progression and it sounded perfect!
As I played on, I couldn’t believe what I was hearing. This totally blew all the rules of music theory out the window as I should have been playing F#m over A or Am over C. I dug into it a little further and found something very interesting. A major and C major have all the same notes except three in common; F#, C#, and G#. Because of the rest of the notes being common, my ear couldn’t tell the difference. The three that were not in common added just enough tension that my ear wanted to hear so it sounded better with that tension than without.
Below is the riff I came up with. It’s a six bar version of the 12 bar blues progression. I recorded several different strummings with the same chords and played the riff against them all. None of them sounded like they didn’t belong together.
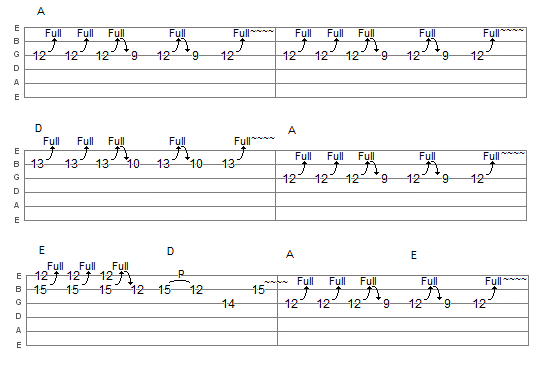
Give the riff a try. If you can, record the chord progression as I have labeled and play the riff against it. Or, try your own combinations. See if a C# minor pentatonic scale sounds good over a C# major chord progression. You may find, as I did, the possibilities are endless and it will give you a new sound.
Share this:

Test Your Skills – Perfecting Your Technique (Part 2)
While teaching the pentatonic scales, it seems as though it leaves my students wondering “what next?” Well, here’s a few skill builders to show you why and how the pentatonic boxes connect. We’ll be in the key of C. To start, let’s take a look at the pentatonic box 3…or the E Phrygian scale.
Below is a simple skill builder starting at the top of the neck. Most instructors should tell you not to focus on playing scales from bottom to top in formation. While this one goes from bottom to top and back down again, it’s the way it comes back down that’s unique. Notice the pattern is in-line while going up the scale, but it’s altered coming down. This trains your mind to think…”outside ‘the box'”…excuse the pun.

One of the most difficult concepts to teach, as well as understand, is how the pentatonic boxes fit together. This next skill builder shows how to use a slide at the end to bring you from the E Phrygian scale to the G Mixolydian scale on the way back down.

Let’s take this a step further. First, we won’t be going up, we’ll be coming down. Second, we’ll be using the E Phrygian scale, the G Mixolydian scale, and the A Aeolian scale…or the minor pentatonic scale.

If you look at the fretboard diagram, you can see how we added the bottom part of each pentatonic to the previous one. This is because the bottom of each pentatonic is the top of the one we’re adding. In the example above, you can see where we transitioned between the scales by using slides. While this isn’t the perfect demonstration, it does show how you can merge three pentatonic scales together. Knowing your scale patterns and how they all fit together will help you play up and down the neck of the guitar with little effort.
Share this:

CAGED Chord System (explained)
You may wonder, sometimes, how some guitar players can come up with a chord out of anywhere on the neck at a moments notice and it always sounds good. This is because they’ve had years of practice, but it’s also because they have picked up techniques for learning what to play and where and when to play it. One of these techniques is called “The CAGED Guitar Chord System“.
Not only is this system based on the C major scale, but it’s also based on the most common chord played. Sure, it leaves out other chords like B, F, and all the sharps and flats, but you’ll see later on how these will all tie in. The one thing to remember with the CAGED system is what and where your root note is.

In the example above the CAGED system starts with the C chord (the red box), hence the name. The root note is the C on the third fret of the A string. Notice the open notes on the G and E string. In essence, they form the D chord, only two frets up. If you fumble when changing chords, playing a D to C or C to D transition can be done from here until you learn to transition to the C’s real position.
In the purple block, you can see how starting on the root note of C using the A bar chord will also produce another C chord. In the green block, the root note is on the 8th fret of the low E. If we place our G chord over that, we get another C chord. This one would be better suited for a capo. Do we see a pattern? We’ve used the C, A, and G chords to locate different places to play a C chord. In the yellow block, you can see we took the E bar chord and started it on the same C root note on the E as we did the G chord. Finally, remember that D chord that was part of the original C chord? If we place that starting on the 12th fret, we get another C chord.
Always remember: the order of the chords never changes even if the starting point does. For example, if you decided to start on the E, the order would still remain the same, only with a different starting point; EDCAG. As shown below, they still follow the same pattern, just from a different starting point. This also changes the root note.

Can anyone another pattern? Look in the green block…it’s seven of the notes in the C#m pentatonic scale, which is the minor pentatonic of what major? Come on now…it begins three frets up from it’s major counterpart…it’s even the chord we started out with…you guessed it, the E. In fact, CAGED is so useful in learning where scales are with in a key, if you know which order of CAGED you are using, you’ll definitely know where to find your corresponding scales are. You may be thinking why, if the C#m is at the end or the EDCAG, why isn’t the Am at the end of the CAGED? It’s really not where the chord shapes end up, it’s where the root notes are. If you look on the EDCAG, the C is on the 8th fret of the E, and what block is it in? Yep, it’s the green block…and three frets up from C is A, hence the beginning of the Am pentatonic. Below is an image of the EDCAG with the pentatonic note fills.
 Another good feature about the relationship between the CAGED system and the pentatonic scales is where to play during a solo. This proves to be a good tool for those of you learning to improvise or trying to come up with a catchy solo. Say you were playing in the key of E and you wanted to come up with a catchy solo. You could introduce the solo with the pentatonic notes of the open low and high E and the B, as well as the notes on the first and second fret, then zip your way up to the pentatonic starting on the twelfth fret to really dramatize the solo. Did that guy just go from E to A? No problem. If you know where the A formation is, the purple block, you should be able to solo around it like you own it. It’s not really that you are playing around the A chord, you are playing around the A formation, however, this brings you down to box 4 pentatonic scale which begins on the B note and makes it seem like you are playing right where you need to…which, essentially, you are.
If you use the CAGED system each time you practice, you will definitely learn where your pentatonic scales are all over the neck of the guitar.

