Test Your Skills – Perfecting Your Technique (Part 2)
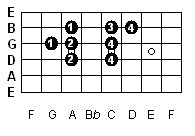
While teaching the pentatonic scales, it seems as though it leaves my students wondering “what next?” Well, here’s a few skill builders to show you why and how the pentatonic boxes connect. We’ll be in the key of C. To start, let’s take a look at the pentatonic box 3…or the E Phrygian scale.
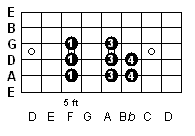
Below is a simple skill builder starting at the top of the neck. Most instructors should tell you not to focus on playing scales from bottom to top in formation. While this one goes from bottom to top and back down again, it’s the way it comes back down that’s unique. Notice the pattern is in-line while going up the scale, but it’s altered coming down. This trains your mind to think…”outside ‘the box'”…excuse the pun.

One of the most difficult concepts to teach, as well as understand, is how the pentatonic boxes fit together. This next skill builder shows how to use a slide at the end to bring you from the E Phrygian scale to the G Mixolydian scale on the way back down.

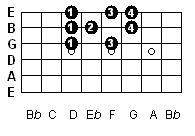
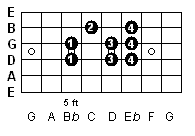
Let’s take this a step further. First, we won’t be going up, we’ll be coming down. Second, we’ll be using the E Phrygian scale, the G Mixolydian scale, and the A Aeolian scale…or the minor pentatonic scale.

If you look at the fretboard diagram, you can see how we added the bottom part of each pentatonic to the previous one. This is because the bottom of each pentatonic is the top of the one we’re adding. In the example above, you can see where we transitioned between the scales by using slides. While this isn’t the perfect demonstration, it does show how you can merge three pentatonic scales together. Knowing your scale patterns and how they all fit together will help you play up and down the neck of the guitar with little effort.
Share this:

R. I. P. Sammy Johns
January 4, 2013 was a sad day for music. Sammy Johns, singer and songwriter, died at the age of 66.
Johns was known for the classic hit Chevy Van. At age 9, he got his first guitar from his dad. By the time he was in his teens, he started his own band called The Devilles.
Artists that Johns wrote for, or who covered his songs, include John Conlee, Waylon Jennings, Sammy Kershaw, and Conway Twitty.
Share this:

Two Years and Nearly 3,000 Visits
Well, as of yesterday, it’s been two years since this blog was started…and what a great run we’ve had. In those two years, there have been nearly 3,000 visits. While that’s nothing like the 2.7 million views that Psy got for Gangham Style, for this type of blog in it’s beginnings, it’s a good start…and things can only get better.
As we draw closer to 3,000 visits, I want to reflect on last year and let you know that there will be even more to look forward to. Last year, 600 people reached the top of Mt. Everest. This blog got about 2,200. Since the beginning of the year, there has been 147 visit. That’s roughly 21 visits a day. Not bad. And with the total views since this blog was started being 2,869, that means that last year was better than the first year and this year is looking even better.
There were 15 posts with 36 images uploaded. The plan is to add more posts with even more information and more images. The best part for the viewers…it’s all free for you to view. I’m sure, down the road, there may be a need to look towards advertising, or adding a link for donations may happen because, as fast as this blog is growing, it may reach it’s limits. Until then, enjoy the benefits of free lessons without being misleading by having to buy a DVD.
The busiest day of the year was October 29th with 40 views. Since then, there have been several days in the 30s. This type of traffic is good to see because it means that people are learning about this blog and finding out that there’s real tabs and real lessons for guitar, where some sites briefly explain a concept and leave you hanging, or create a tab that sounds nothing like the actual song. All images, whether tab or instructional, are intended to give the viewer a better understanding of what their learning.
So, what can you look forward to? Well, I know, through viewing the traffic reports that the Mustang Sally solo is one of the most popular visits. I do have to apologize, but that solo will be revamped because, as my goal is to give you real tabs, I looked to an online tab to learn Mustang Sally and never found one with a solo or any fill-ins. The tab I found was a fairly fast, rock-style version of the song and I created the solo upon that. I do have to thank Steve who commented on that post that it was written in 12 bar blues when the actual song is in 24 bar blues. His disappointment led to my disappointment, and I can’t have that. Also, I’ve posted tabs to other songs, but have not added the solos for those either. Those will also be done this year so you will have complete tabs, with their explanations, to view and learn from.
Other than that, thank you to everyone who has given this blog such a wonderful year, and thank you to all the future viewers. I look forward to giving you the lessons you’ve been looking for without the need to empty your pocket book.
Share this:
Know Your Scales – Revisited
Here it is…the first lesson of the new year!!
Recently, one I was teaching one of my students their scales. This student had taken lessons from a different instructor, but was feeling like something was missing. I was teaching the major scale and how, if you remove the 4th and 7th notes, it becomes the beginning of the major pentatonic scale. He mentioned that it looks different than the major pentatonic that he was taught. That’s because the previous instructor, who had a degree in music and played in three different bands, had taught him the wrong thing.
Below are two versions of the major scale. Notice the numbers for the fingers to use, and that the patters are the same, just on different strings.


These next two images are of the same scale pattern, but, because of the orientation of the B string, you have to shift the fingering just a bit.
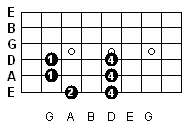
My student was amazed that you could use the same position across the neck of the guitar. He was only taught how to start on the E or the A string. If you truly want to learn to play guitar, you have to know where the notes are on the fretboard and you have to know your scales. In the image below, I showed him how removing the 4th and 7th notes produces the beginning of the major pentatonic. Look at this, then scroll up and look at the G scale above. See how it works?
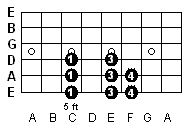
Then, I explained to my student that what he was taught was the minor pentatonic. To start, I first showed him the above examples, then showed him how the minor scales look. Below are the first two minor scales. Again, same pattern, just different strings. Also note that the above patterns started on the 3rd fret, where the ones below start on the 5th. All of the patterns I’m showing you can be played up and down the neck of the guitar, but, for learning purposes, I chose to start them like I did.
As with the major scales, the minor scales also have to be adjusted when playing over the B string.

Here is where I showed him that he was truly learning the minor pentatonic scale. Instead of removing the 4th and 7th notes, we will be removing the 2nd and the 6th notes.

My student was completely surprised, but later told me that it makes perfect sense when you remove the notes to get the pentatonic.
My advice…practice these scales up and down the neck of the guitar. Not only will you be able to play them better when you do, but your soloing will improve as well as you’ll have a much better idea of where each scale can be played.
Share this:


Test Your Skills – Perfecting Your Technique (Part 1)
In this multi-part series, we will look at techniques to help you play better. This is not to say that everyone is not playing well, but, simply put, it’s to help you improve what skills you already have. These are techniques that I, or others, have developed that have helped, not only myself, but also my students, play better than we did before.
This part will pick up where the previous Test Your Skills lesson, The Perfect Warmup, left off. In that lesson, we were talking about using the Gym exercises and the Digi-Flex to warm up and build finger strength and coordination. In my lessons I give to my students, one of my lessons is called “Flailing Fingers Are Failing Fingers”. If anyone who is new to guitar, or has played for years, has had this problem, you’ll understand perfectly what I mean. Flailing fingers are fingers that, as soon as they are lifted from the string, fly 3-4 inches into the air to where they are almost perpendicular to the fretboard. This is fine if you plan to play songs no faster than 60 bpm. If you have honed this talent and can play faster, more power to you. It’s pretty much guaranteed you’ll never play Flight of the Bumblebee if you play like this. As a rule of thumb, 1/2 an inch is the maximum you should lift your fingers from the strings. This will give you better control over the speed and accuracy of your playing.
I noticed one of my students playing with flailing fingers. Knowing I had done it myself in the past, and how much my playing has improved ever since I got out of that bad habit, I had to get him out of it as well. At first, he was having the same trouble I was having…old habits are hard to break…especially the bad ones. By the end of our hour lesson, after working with him on it for about 15 minutes, his finger control was much improved. Not long after, he called me to reschedule a lesson as it was conflicting with a previous engagement and told me that he had been practicing this skill and was getting much better. It especially helped with scale practice as he was able to more fluidly go through each scale. He noted that, each scale he practiced, he could hear that scale in many of the songs he has heard. Without perfecting this skill, he may not have heard this.
Another technique I teach my students is to warm up with chromatic scales. If you are 40 or over, like I am, and this is your first time playing, or if you’ve never played, it’s almost guaranteed your dexterity is going to be a lot more rigid than someone in their 20s. That’s not to say that someone in their teens would have better dexterity, but chances are you’ve never really stretched your fingers anymore than you needed to. One of my students had this issue. He had damaged his fingers over the years from different accidents and his hands weren’t as flexible as they used to be. I told him the key is to stretch prior to playing. I had him hold out his left arm, wrap his right hand around all of his fingers, then gently pull down and towards his elbow. This stretches your upper forearm. I then had him individually pull each finger back as far as he could go, then do the same with his thumb. These stretches can be found at Musician’s Health.com with complete descriptions on how to do the stretches, as well diagrams on how to do these and other stretches. There are also many interesting articles and other things to help inspire the musician in you. I also had my student use his right thumb and pinky fingers to spread the webbing between each finger of his left hand. This is especially helpful if you are playing in the upper 5 frets as it can be difficult to reach a span of 5 frets at any given time.
After stretching, my student was playing chromatic scales better, but was still having issues with muted strings, buzzing strings, and making the total stretch. My next piece of advice for him was to pretend he accidentally got super glue on his hands before playing. With his first finger (index finger) on the first fret, I told him to lock it in that position and play the next note on the second fret with his second finger (middle). As he did so, I noticed that both notes were ringing clear, but he was rocking his hand to prepare for the next fret. I warned him to not rock his hand, but to hold it steady, lock in the first two fingers, then reach for the third fret with his third finger (ring). This he did, and successfully made the note ring. Finally, I told him to lock the first three fingers in and reach for the fourth fret with his fourth finger (pinky). Then I had him hold that position for as long as he could. We then went through the stretching exercises again. By the end of our hour lesson, he was playing the chromatic scales more fluidly and every note rang clearly.
Next time you practice, pull up these Test Your Skills series and use them as part of your warm up and practice time. I’m sure you’ll notice a definite difference in your playing.
Share this:
CAGED Chord System (explained)
You may wonder, sometimes, how some guitar players can come up with a chord out of anywhere on the neck at a moments notice and it always sounds good. This is because they’ve had years of practice, but it’s also because they have picked up techniques for learning what to play and where and when to play it. One of these techniques is called “The CAGED Guitar Chord System“.
Not only is this system based on the C major scale, but it’s also based on the most common chord played. Sure, it leaves out other chords like B, F, and all the sharps and flats, but you’ll see later on how these will all tie in. The one thing to remember with the CAGED system is what and where your root note is.

In the example above the CAGED system starts with the C chord (the red box), hence the name. The root note is the C on the third fret of the A string. Notice the open notes on the G and E string. In essence, they form the D chord, only two frets up. If you fumble when changing chords, playing a D to C or C to D transition can be done from here until you learn to transition to the C’s real position.
In the purple block, you can see how starting on the root note of C using the A bar chord will also produce another C chord. In the green block, the root note is on the 8th fret of the low E. If we place our G chord over that, we get another C chord. This one would be better suited for a capo. Do we see a pattern? We’ve used the C, A, and G chords to locate different places to play a C chord. In the yellow block, you can see we took the E bar chord and started it on the same C root note on the E as we did the G chord. Finally, remember that D chord that was part of the original C chord? If we place that starting on the 12th fret, we get another C chord.
Always remember: the order of the chords never changes even if the starting point does. For example, if you decided to start on the E, the order would still remain the same, only with a different starting point; EDCAG. As shown below, they still follow the same pattern, just from a different starting point. This also changes the root note.

Can anyone another pattern? Look in the green block…it’s seven of the notes in the C#m pentatonic scale, which is the minor pentatonic of what major? Come on now…it begins three frets up from it’s major counterpart…it’s even the chord we started out with…you guessed it, the E. In fact, CAGED is so useful in learning where scales are with in a key, if you know which order of CAGED you are using, you’ll definitely know where to find your corresponding scales are. You may be thinking why, if the C#m is at the end or the EDCAG, why isn’t the Am at the end of the CAGED? It’s really not where the chord shapes end up, it’s where the root notes are. If you look on the EDCAG, the C is on the 8th fret of the E, and what block is it in? Yep, it’s the green block…and three frets up from C is A, hence the beginning of the Am pentatonic. Below is an image of the EDCAG with the pentatonic note fills.
 Another good feature about the relationship between the CAGED system and the pentatonic scales is where to play during a solo. This proves to be a good tool for those of you learning to improvise or trying to come up with a catchy solo. Say you were playing in the key of E and you wanted to come up with a catchy solo. You could introduce the solo with the pentatonic notes of the open low and high E and the B, as well as the notes on the first and second fret, then zip your way up to the pentatonic starting on the twelfth fret to really dramatize the solo. Did that guy just go from E to A? No problem. If you know where the A formation is, the purple block, you should be able to solo around it like you own it. It’s not really that you are playing around the A chord, you are playing around the A formation, however, this brings you down to box 4 pentatonic scale which begins on the B note and makes it seem like you are playing right where you need to…which, essentially, you are.
If you use the CAGED system each time you practice, you will definitely learn where your pentatonic scales are all over the neck of the guitar.
Share this:

Sunshine of Your Love (explained)
If you know anything about Eric Clapton, besides that he’s one of the greatest musicians of all time, you know he was also in several other bands that he is well known for such as The Yardbirds, John Mayall & The Bluesbreakers, and Derek and the Dominos. Before he was in Derek and the Dominos, he was also in the band Cream. One of his legendary hits was Sunshine of Your Love.
For those of you who know the song, many have tried to cover it, such as Jimi Hendrix, Blood Sweat & Tears, Living Colour, and Ozzy Osbourne…each with their own style. Staying true to the original recording, this tab is going to go beyond what other tabs out there have done.

Above is the intro to the song. Played in the key of A, many tabs on the internet have kept true to how this is played with one exception…if you notice when I bend the F on the 10th fret, I add a tiny bit of vibrato. If you listen closely to the original, you can hear a slight hint to this, but others who have covered it have made that vibrato more pronounced; which I feel adds to the song. This part is played twice before going into the main riff.

Where other tabs have gone wrong is the main riff. They keep showing the intro as if that’s all there is to the song. Once again, if you listen closely, you can hear the C and D bar chords as I have them tabbed here. This gives the feeling of two guitar parts with a single, richer sound like it is in the recording. This part is played four times before the next part, then twice after the next part.

Here again, I used the F and G bar chords for a richer sound. The rest of this riff was moved up one string, but is the same pattern. This part is played twice within each verse.

The part above is the bridge. This is played three times. Notice the strumming directions under the A bar chord at the beginning. Not only does this save you energy to strum this way, but it also adds to the sound that you can hear in the actual recording.

Above is the last part of the bridge. That’s the main part of the song. I’m still working out the solo, so keep checking back, and have fun with this one like I have. When you’re ready, try playing against the actual song.
Share this:

Test Your Skills – The Perfect Warmup
As I’m sure you are, I’m always looking for ways to improve my guitar playing. Over the past three years since I’ve gotten back into playing after many years of not, my playing has surpassed what it used to be when I was younger, but I still feel I need to do more. So, I decided to challenge myself to see how much I’ve improved.
I found some excellent warmup exercises on a site called My Guitar Solo. These are called “Gym Warmups” for the simple fact is it’s like warmup exercises at a gym…up and down. I decided to start with Gym 1, which starts at the 5th fret of the low E and alternates between the 5th and 6th frets using your index and middle fingers (1 and 2) while going across the fretboard to the high E. Coming back down, you use your pinky and middle fingers (4 and 2) on the 8th and 6th frets, respectively. It continues on to incorporate all four fingers in their respective frets.
How hard can that be? Well, for beginners, it may be slightly difficult to apply enough pressure on the string being played to produce a clear tone while holding all other fingers just slightly above string while over their respective frets with little or no movement and be able to keep in time with a metronome. If that sounds too easy for you, purchase a finger exerciser. These can be found online at Amazon.com, or at any participating music store. They are also used in physical therapy for people who have grip issues. I have the yellow Digi-Flex 1.5 lbs (0.7 kgs) exerciser. I followed the same pattern as the gym exercise, but I used a timer to make sure I was holding the desired key down for exactly 5 seconds while making sure that my other fingers were resting on top of the other keys and not pressing down.
The first few times I used the exerciser, I could really feel it in my entire hand, but the more I used it, the more comfortable it became. How did it help my performance? Well, my fingers stayed right above the strings with little or no movement because they were conditioned to do so and the muscles were built up to hold them there. I also noticed less buzzing…especially with my pinky finger. I plan on buying the next size up exerciser to make it more challenging…as well as try to use the exerciser on the rest of the gym exercises to further strengthen my fingers for different playing patterns.
Another practical use I’ve had for using the finger exerciser is to practice the five boxes of the pentatonic scales. If you have a diagram of each of these, try it out. If not, you can always use the diagrams in my blog Know Your Pentatonic Scales. I’ve noticed after going through each of the boxes with the Digi-Flex, then actually playing them on the guitar, it feels like my fingers are floating on air when I play.
Give it a try and tell me what you think. I’d also like to hear what you do for warmups and what has worked for you to improve your playing. The one thing I’ve learned is you can never have enough alternatives when it comes to practicing, playing, and learning.
Share this:
Speed Control – Einstein vs Guitar
Recently, I’ve visited several sites and blogs in an attempt to increase my speed. Mind you, I can play every song I know to the speed it’s supposed to, but when playing some classical pieces, or some faster rock, blues, or country, I tend to choke up, fail, and end up not practicing that song often until one day, for some odd reason, my mind and fingers happen to be working at the same pace and I can actually play. One thing that many of the sites and blogs had in common was discipline. No, I’m not smacking myself on the nose with a rolled up newspaper, but I kept seeing terms like “lazy pinky” or “whacky pinky” and it got me thinking “I have that…”. That was my Einstein moment. You may ask, “what does Einstein have to do with guitar?”…E = mc².
“E” stands for “excellence”. This is what every musician, singer, athlete, artist, etc., strives for. No one wants to go into the local music store, pick up an instrument, and start playing only to be laughed at or shown up by someone with REAL talent. They want to be excellent. The only way to be excellent is to make sure you cover both of the “mc”s.
The first “mc” stands for “mind control”. When you’re practicing scales, arpeggios, or songs, you need to teach your mind to make your fingers do what you want them to, not what your mind tricks you into doing. Practicing at different speeds helps you develop this because when you practice ultra slow…say 30 beats per minute for a quarter note…you can almost run and get a cup of coffee down the street between beats, but it allows your mind to focus on what you’re currently doing and what your next step will be. This, in itself, can be tricky because you have to teach your mind to wait until the next beat to move on. This is where the second mc comes in.
The second “mc” stands for “manual control”. You can teach your mind to wait for the next beat, but do your fingers do what your mind tells them to? Also, do you have lazy fingers, or whacky fingers when you start playing faster? Ever wonder why you peak out halfway through? Because you’re wasting energy. I’ll bet you’ve noticed as you go faster when you are taking your pinky off of a note and picking at the same time, it’s either muffled, or the note that your pinky already played. Same when you’re putting your pinky down to play a note. This is because you’ve taught your picking hand to keep the pick as close to the strings as possible when trying to play fast, but you haven’t taught your fretting hand to do the same.
I’ve seen many sites offer skill builders for this. Many say to try chromatic scales. This is where you play frets 1-2-3-4 with your respective fingers. Try this at 30 bpm. When you get to the high E, slide each finger up one fret, then play in reverse…5-4-3-2. While you’re doing this, try to keep all your non-playing fingers approximately 1/8 of an inch above the strings while not allowing them to touch so the notes ring out. Also, make sure your thumb is in line with your index finger. This helps with fatigue and gives less of a reach for your pinky finger.
Once you master this at 30 bpm with your pinky ending on the twelfth fret, increase it to 32 bpm. Keep going until you reach your maximum speed where you start messing up. Is it faster and more fluid than before? Try alternating the pattern each time you practice this. Next time, try starting with 1-3-2-4…or even 1-4-2-3. Force your mind and your fingers to work together, but keep that 1/8 of an inch spacing above the strings at ALL times. After a while, you’ll notice it getting easier to keep your fingers where you want them and your speed will shoot through the roof. This is where you’ll agree with Einstein that E = mc².
